
by hankinslawrenceimages | Jan 7, 2015 | Photoshop, Software

Whether its Kitty Dusty dressed up as Harry Potter or Kitty Ansel in his Santa hat, every time I post a photo of any of our cats dressed up for the holidays I always get asked “How do you do that? How do you get the cats to wear the hats and pose for you?” The secret is – we don’t!

Bill and I did try putting hats on the cats in the past for their photos – we never got any good photos. But we did really annoy the cats (and occasionally have to patch up a bleeding photographer). So we figured out how to do it in Photoshop (you may also be able to do this in Photoshop Elements – we don’t have a current version so couldn’t check to see if it would work.) With a little practice – you too can dress your fur-kids up for the holidays.
The main Photoshop techniques we use are extracting an object using the “quick select” and “refine edges” commands, and resizing an object using the “free transform” command. We’re not going to go into step by step details on how to use them. Great info on both can easily be found on the web (how do you think we learned how to do this?).
First, we start with a picture of our model, Kitty Ansel. Ansel loves to pose on the posing stool, making this part easy. For those interested, we used a strobe with softbox on camera left, and one with a strip light camera right, set about 1 stop below the main light. Before we had studio lights and such, we put a sheet on the wall for background in a room that had enough window light to photograph the cats.

Next, we use a Teddy bear to photograph the Santa hat in the same light we used for Ansel (this makes the combination look more realistic).

Using the “quick select” tool (located in the same box as the “magic wand” tool, Bill roughly selected the Santa hat, and used the “refine edge” button to refine the selection. He set the refine edge to save the selection as a new layer with layer mask. This gives you a layer showing just the Santa hat.
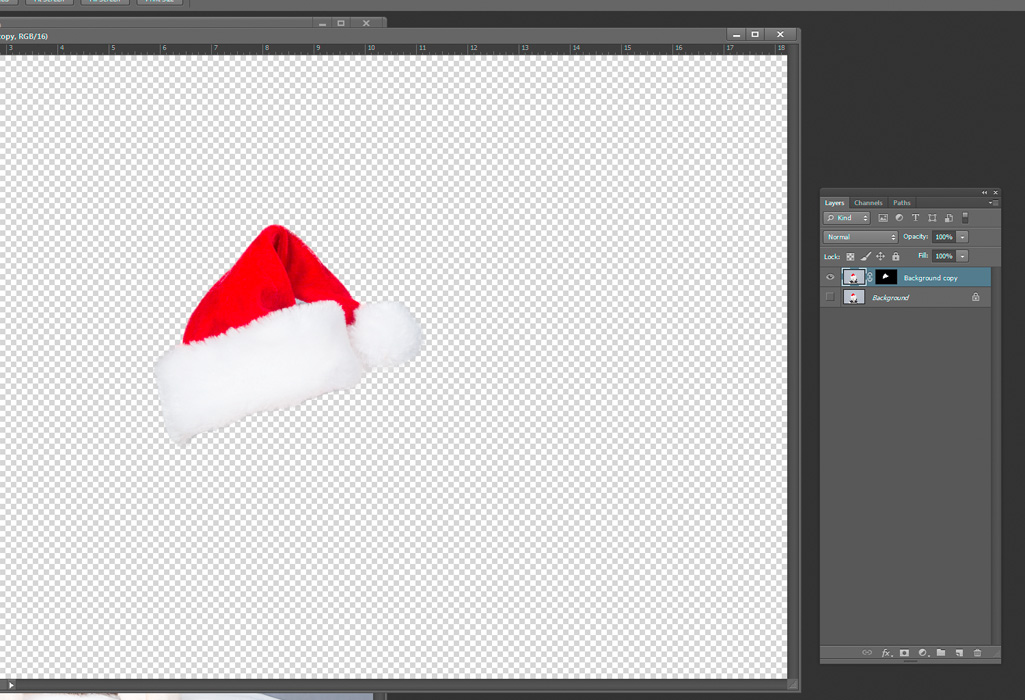
Now with both the cat photo and the Santa hat photo open, drag the hat layer from the hat file to the cat photo.

This gives you a hat on top of the cat, although the size and the angle are wrong. The “free transform” tool (Ctrl-T in windows) with the hat layer selected will let you rotate the hat, and change the size so that you can create a hat that fits the cat. To make the combined photo more realistic, Bill used a little darkening curve masked to show under the hat to give the appearance of shadow immediately under the hat.
The final result:

A wonderful photo of Kitty Ansel wearing his Santa hat and no photographers were harmed (or had to visit the ER) in the creation of the photo!
by hankinslawrenceimages | Jul 20, 2008 | Software
On Thursday, I finally was brave enough to upgrade the firmware on my iPhone. Since I wasn’t seeing any reports of major crashes from people upgrading, I figured it was safe for non-techies like me to upgrade. I’m really glad I did – because now I can access all the apps in the iTunes Store. All the application links in the post are direct links into the iTunes store. If you don’t have iTunes installed on your computer, I’m not sure what will happen but I wouldn’t recommend clicking on any of the links.
In just a few days of checking things out, I’ve found a few applications that are going to be really helpful for me as a photographer. My four favorites (so far) are
Astromo from Gandreas Software. Astromo lets you know when sunrise and sunset are for your location – and what planets are visible in the skies in the Orrrery view. The Armillary view provides detailed starmaps. The Ephemeris view has detailed information about rising and setting times for the sun, moon and all the planets. This will be great when I’m out in the field and can’t remember when and where the sun or moon is rising or setting. Astromo costs $ 9.99.
iCSC Clear Sky Clock from Microprojects. Designed for astronomers, the clear sky clock lets you know when in the next 48 hours the sky is likely to be clear or dark (cloudy). The program includes a list of specific locations in the US and Canada. All you have to do is choose the one nearest your location to get a forecast. As photographers, we’ve used the online version of a Clear Sky Clock, to figure out likely conditions when we’re hoping to photograph the moon. The data I look most closely at on the Clear Sky Clock are Cloud Cover (the darker the blue – the clearer the sky), Transparency (the darker the blue the more transparent the sky) and Darkness (the darker the blue/black – the darker the sky). The iCSC Clear Sky Clock is free.
Weatherbug from WeatherBug. There are several apps available that provide weather forecasts. What Weatherbug provides in addition a basic weather forecast is radar maps. It’s a much easier to make a decision about going out photographing if the weather forecast is iffy when I can take a quick look at the radar map and see for myself how much and how heavy the precipitation is in the area. Weatherbug is free.
Exposure from Connected Flow. Exposure and Exposure Premium are great interfaces for accessing your Flickr account from your iPhone. You can easily access your photos, sets, tags, and favorites. You can also browse your contacts photos. Flickr can also show you photos taken near where your current location. Exposure is free with advertising displayed at the top of each view. Exposure Premium costs $ 9.99 and does not have any ads.
The non-photography related apps I’ve installed on my phone are eWallet, eReader, Shazam and Twitterrific.
Finally, there is a video on YouTube about an app that I’m sure most photographers would be amused to see on the iPhone knowing what a memory hog it can be on desktop computers – Photoshop for the iPhone.
I’d like to thank Dan van Moll, Michael Domingo, and Phill Price who all answered my twitter request for help on how do I create links into the iTunes store. Without their help, I would have had to give you directions on what to search for in the iTunes store rather than the direct links.
If you’ve found any iPhone apps that you think other photographers might like, please leave a note about them as a comment to this post.
by hankinslawrenceimages | Mar 3, 2008 | Software
Photographers who post their photos online are frequently concerned about people using their photos without permission or claiming ownership of their photos. One way to lessen the risks is to watermark your photos before posting them. A watermark is a way to putting your name/copyright information directly into your photo.
We’ve recently found a couple of handy little programs for Windows XP and Vista that make it easy to watermark your photos. uMarkLite and uMark Professional are made by Uconomix and can be downloaded from their website. Both versions were easy to download, install and run.
uMark Professional allows you to place a custom watermark in any location on a photo. You can also tile the watermark so it appears repeatedly on your photo. It allows you to process an unlimited number of photos at a time, and can handle five types of files (jpg, tiff, png, bmp, and gif). You can download a 15 day trial version of uMark Professional and then purchase it if you like it for $ 19.99.
Here are a few screen shots from uMark Professional which shows how easy it is to use:

Choose your photos to watermark

Create and place your watermark

Determine where the watermarked photos will be saved

The watermarked photo
uMark Lite is available for free. It has fewer features than the Professional version. It only handles three file types of files, limits you to processing 50 files at a time, and only allows places the watermark in one of 9 preset positions. You choose what the watermark to read, and where it is placed on your photo. There is a small uMark Lite logo placed on files created using the Lite version.
uMark is a great utility program for photographers. If you do download it and find it useful, we’d recommend getting the professional version. For $ 20, you get many more features, and won’t have the logo from the free version on your photos. You’ll also be supporting a company that created the program.
We’d like to thank Tinu Abayomi-Paul of the Increase Your Website Traffic blog for the heads up on the uMark software.
by hankinslawrenceimages | Jan 9, 2008 | Photo Locations, Software
As landscape photographers, one of the great challenges is knowing when to be at a location for either sunrise, sunset, moonrise or moonset. A few years ago, we discovered a software program Heavenly-Opportunity that makes this task much easier for photographers in the United States.
Heavenly-Opportunity accurately predicts the time and location for each of these events, as well as the phase of the moon for over 30,000 locations in the US. The program includes information for much more than just about every city or town in the country. It also includes information on 500 National Parks, National Wildlife Refuges, and recreation areas and 2500 names lakes, mountains or other named geographic feature In the past we had to find information for the nearest major city, now we can have information about the exact location we’re planning on shooting at. On our recent trip to Blackwater and Bombay Hook National Wildlife Refuges, we knew exactly when and where sunrise and sunset would be, which made it easy to plan our photography.
In addition, the software allows you to enter a latitude and longitude and get information for a specific place. This is a great feature if you are using GPS to determine your location.
Another wonderful feature is the ability to search for specific criteria for a location – and determine what dates you should plan on shooting. For example, we had been trying for several years to get a photo of the Lincoln Memorial, Washington Monument and U.S. Capitol Building with a full moon over the Capitol. We knew where to take the photo from (in front of the Netherlands Carillon near the U.S. Marine Corps War Memorial in Arlington, VA), that if the moon comes up between roughly 80 – 100 degrees and if moonrise after sunset – we should be able to get the image we want. With Heavenly-Opportunity, we knew there were four nights between July 2006 and June 2007 to take the photo. One of them was on March 4, 2007.
That night, Bill took the photo we call Full Moon Over DC.

Full Moon Over DC (c) 2007 William Lawrence
Yes, Bill really did get the Lincoln Memorial, Washington Monument, US Capitol Building with the Tower of Learning of the Jefferson Building of the Library of Congress silhouetted by the full moon all in one shot. It’s not a composite image. And it only took us four years of trying to get this photo.
Heavenly-Opportunity isn’t the first software we tried for keeping track of the sun and the moon. We still use Ephemeris by Jonathan Sachs on our Pocket PCs. It’s fine if we need quick info out in the field.
Heavenly-Opportunity has two main advantages over Ephemeris: the much larger number of locations included in the program and the search function. The search function alone is well worth the cost of the software. If we’re planning trips, we use this program to plan where and when to be.
Heavenly-Opportunity is distributed as shareware by Fossil Creek Software of Fort Collins, CO. You can use an unlicensed version for 30 days. After than, you really should purchase the license. The cost for a licensed version is $ 24.95. The license allows you to install as many copies of the program as you need – we have it installed on both our desktop machines and our laptop.
As far as we are concerned, Heavenly-Opportunity is must-have software for landscape photographers. We really encourage everyone to go to the Fossil Creek site and download the trial version. Be sure to buy your copy before the 30 day trial period is up. Once you start using Heavenly-Opportunity – you will wonder how you ever got along without it.
