by hankinslawrenceimages | Jul 15, 2008 | Camera Collection
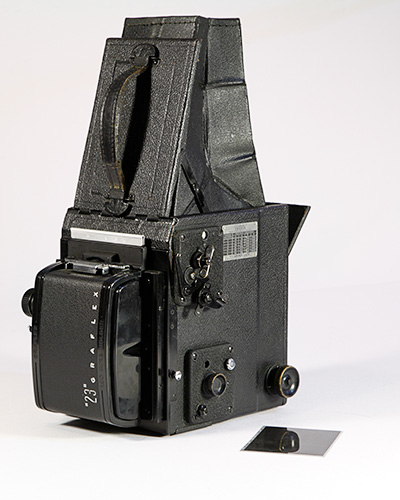
Recently, Bill has been experimenting with a vintage Graflex RB Series B Single Lens Reflex (SLR) camera – and taking some excellent photos with it. You may have read a little bit about Bill’s camera in a blog post Jeff Revell wrote after Bill brought the camera on the Georgetown Photowalk last month.
(c) 2008 William Lawrence
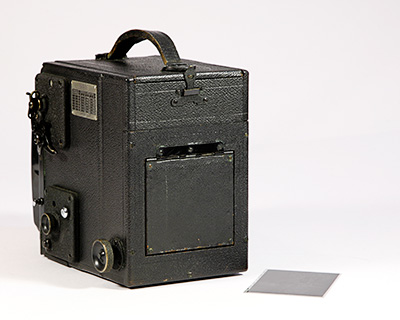
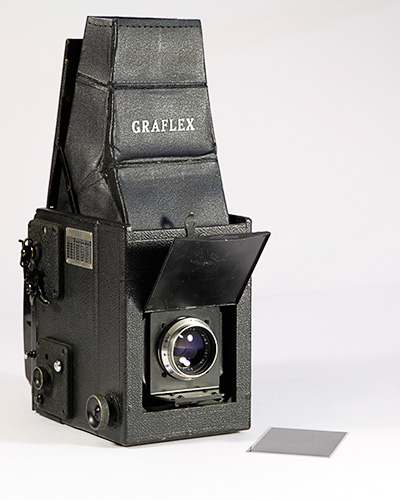
We’re not sure when the camera was made. Graflex produced this model camera between 1923-1951. Our guess is that our camera is from later in the run. Folded up, as in the photo above, it looks somewhat like a box camera. However, the top opens and the lens compartment open up as below, to give you an SLR with a top viewfinder in the “chimney”.
(c) 2008 William Lawrence
You can see the Kodak Ektar lens (made in 1956, at the time one of the premier lens series), backed by a set of bellows that allow focusing by turning the know on the bottom right of the camera. The aperture is set manually, and typically Bill has to focus and compose with the lens wide open, turn the aperture to the desired f-stop, and hope that there is enough light to make sure he has recomposed the scene correctly (he usually doesn’t use this camera with a tripod, but it’s a great hand-held camera).
The camera originally was designed for either 2-1/4”x3-1/4” sheet film, or 120 roll film in a roll film holder on the back. Bill uses roll with a 2-1/4”x3-1/4” roll film holder on the camera. Since this film is still readily available, it makes a convenient format, and the image size is large enough to get a reasonable enlargement from the negative. To give you an idea of the size of the camera, each of the images has a 2-1/4”x3-1/4” negative (cut from a roll of 120 film). A sample negative is next to the camera in the photo.
(c) 2008 William Lawrence
This camera is a great “walking around with camera”. While it has a tripod mount, it really is designed to be used handheld. The design forces you to hold the camera against your body, which helps steady it at lower shutter speeds. The lens opens up to f4.5 (they make faster lenses, but this wasn’t too bad for the time), and it is a great camera for shooting low depth-of-field photos by shooting with the lens wide open or close to it. The 127 mm Ektar lens gives a pleasing “bokeh” or appearance of the out of focus areas of the photograph.
Here are some of the photos Bill has taken with his Graflex Series B SLR.
 (c) 2008 William Lawrence
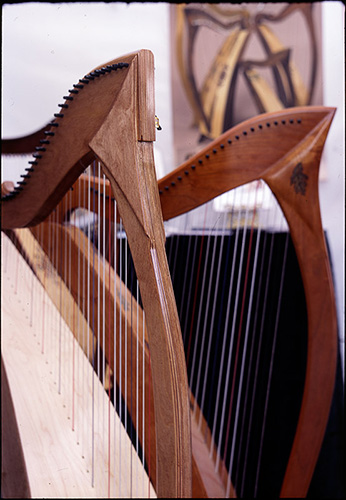
Bill took this photo of two of the incredible harps from Heartland Harps at a show we were visiting. If you like harp music, be sure to check out Pamela Bruner’s music. I’ve got at least 10 of her CDs – Here Be Dragons is my favorite.
(c) 2008 William Lawrence
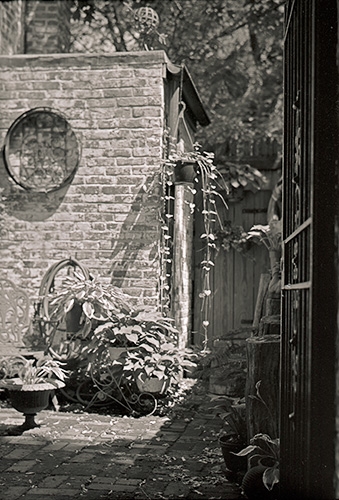
Bill took this photo of a garden along the C&O Canal on the Georgetown Photowalk in June.
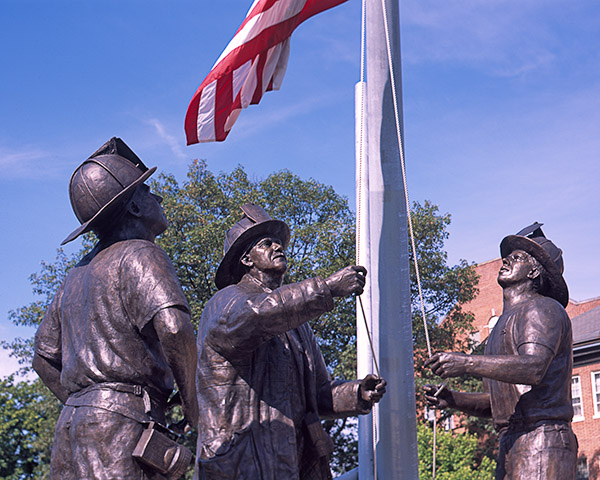
September 11 Memorial II (c) 2008 William Lawrence
The September 11 Memorial is located on the campus of the National Fire Academy in Emmitsburg, Maryland.
Bill was having so much fun with his Graflex RB Series B SLR Camera that he has gotten two additional Graflex SLR models – both RB Super D SLR cameras. One uses 3 1/4″ X 4 1/4″ film, the other uses 4″ X 5″ film. This past weekend, I gave one of the Super D cameras a try – it was pretty easy to use (and this from someone who went digital in 2000).
You can find more information about the Graflex RB series of cameras at www.graflex.org. Among the documents on the site is a navy manual for the cameras. In case you were wondering – the navy did not think the Graflex SLR cameras were suitable for photographing aircraft carrier landings!
If you have a chance to try one of the Graflex RB SLRs, we highly recommend you give it a try. You may not get an image that is as tack-sharp as the state of the art medium format cameras, but you just might find you get images you are happy with. You will also get some amazing looks and comments from people as you photograph with it!
by hankinslawrenceimages | Mar 27, 2008 | Camera Collection, Photo Locations, Photo Tips, Washington DC
In an earlier post, we explained how Bill used a view camera to help achieve his vision by setting the focus along the entire section of the Vietnam Wall, getting everything he wanted in focus. In this post, we will explain how he used the movements on the view camera to get things he didn’t want out of focus.
Below is our photo “Lone Sailor” of the Lone Sailor statue at the US Navy Memorial. This memorial was one of the most challenging memorials in the Washington DC area to photograph. It took us several trips exploring the monument and taking various test photos before we were able to plan the photos we wanted to take.
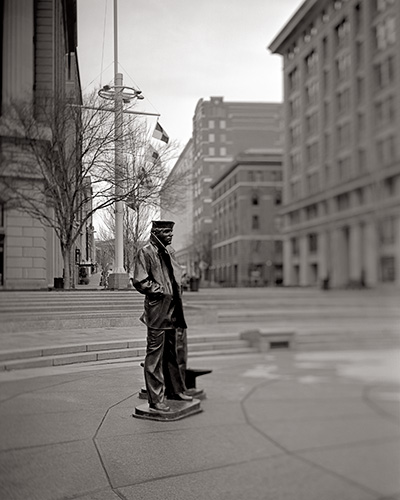
Lone Sailor (c) 2008 William Lawrence
At first glance, the Navy Memorial doesn’t seem that hard to photograph. A closer look reveals that it sits in the middle of downtown Washington, DC. Surrounded by buildings, the memorial has several major elements, including the sailor statue, the ships mast and several walls spread out over a plaza. At certain times of the day, a neon deli sign is visible just over the sailor’s shoulder.
Getting the sailor statue and one of the surrounding masts from the memorial into the photo isn’t really difficult, but getting these elements without a bunch of distracting elements (the surrounding buildings) is essentially impossible since the statue is surrounded by buildings, as shown in figure 1 below. To get a good view of the statue, including the face of the sailor, the surrounding buildings are going to be in the photo.
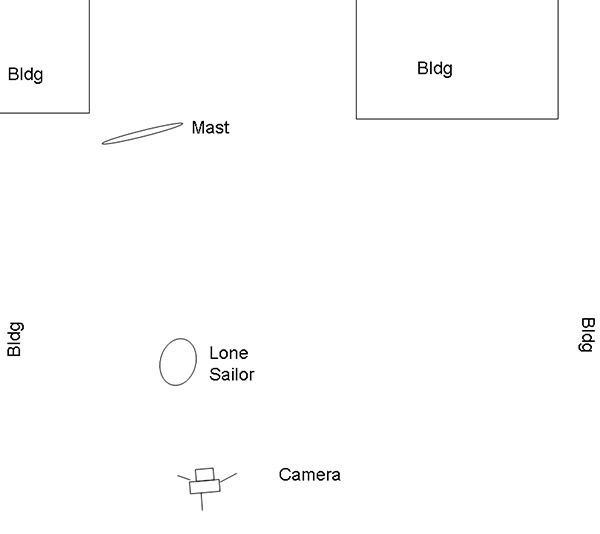
Figure 1 (not drawn to scale)
The human eye is naturally drawn to items in a photograph that are in sharp focus, and tends to pass over out of focus elements. By using a large amount of swing in the view camera on both the front and rear standards of the camera, Bill was able to set the plane of focus so that the sailor statue and mast were in focus, and the building were out of focus. (See Figure 2)
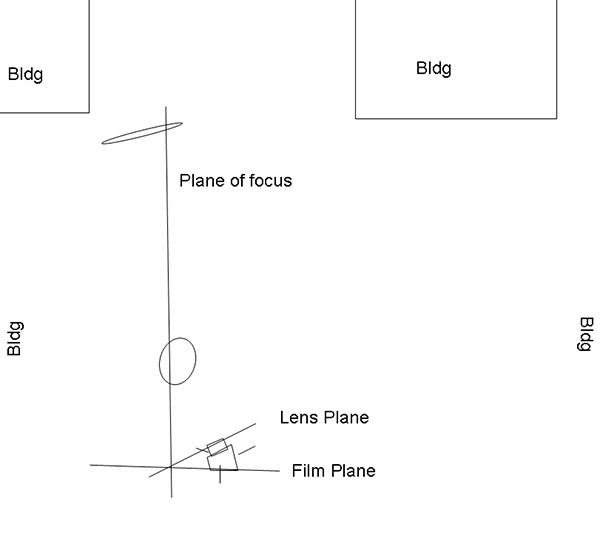
Figure 2 (not drawn to scale)
In addition to using swing on the camera, Bill used a large aperture (small f-stop number) for very narrow depth of field. The narrow depth of field ensured that everything except the statue and the mast were out of focus (you can see this more on the buildings to the right than to the left, but it is present on both sides). Instead of being a set of distracting elements in the photograph, drawing your eye away from the memorial, the out of focus buildings fade into the background as unobtrusive compositional elements, drawing the eye to the memorial.
The combination of the narrow depth of field and use of the movements on the view camera allowed Bill to achieve his vision of a photograph emphasizing the memorial within its cityscape environment.
by hankinslawrenceimages | Mar 6, 2008 | Camera Collection, Photo Tips
In a earlier post, we talked about Bill’s favorite camera (his K.B. Canham View Camera), and why he likes using it. Since a view camera can somewhat complex to use, we decided to write a few posts on some of the interesting ways Bill has used the view camera to create the images he wanted to. If you are seriously interested in using view cameras, check out Leslie Stroebel’s book, View Camera Technique.
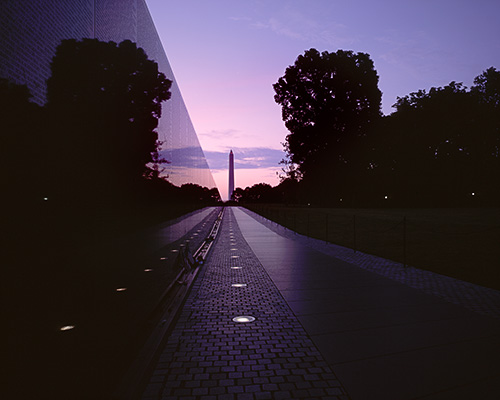
Bill’s photograph of the Vietnam Wall at Dawn is one of his best examples of how he used the view camera to create an image with specific qualities. The photograph was taken right before sunrise, shooting along the east side of the Vietnam Wall with the Washington Monument in the distance.
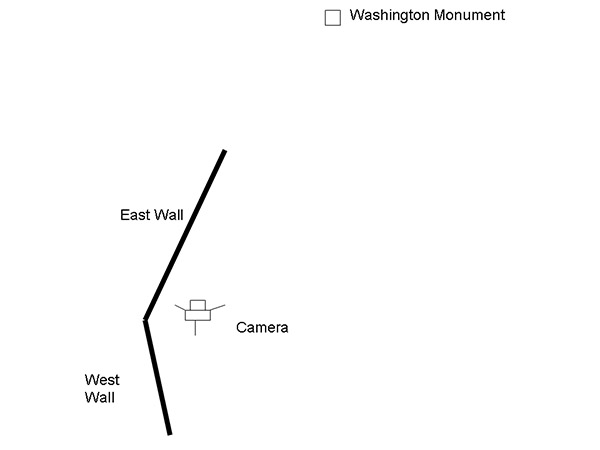
The layout Bill used for the photograph (not to scale, our PowerPoint skills are not that good) is shown in Figure 1. Essentially, the camera mounted on a tripod is set to shoot along the wall, while keeping the Washington monument in the field of view.
Figure 1
Figure 2 illustrates what you get when you use an SLR or point and shoot camera. With this type of camera, the plane of the lens is parallel to the plane of the film (or sensor in a digital camera). The plane of sharpest focus (what you focused on) is also parallel to the film. Everything in the plane of focus will be in sharp focus. The further you move away from the plane of focus, objects will appear more out-of-focus in the photograph.
If you were going to recreate Bill’s photograph using an SLR, the challenge is how do you keep both the closest part of the Wall and the Washington Monument in focus? You can do it to some extent by using a very small aperture to get large depth of field, but even that has its limitations.
Figure 2
With a view camera – the lens plane and the film plane don’t have to be parallel. You can use camera movements to angle the film plane and the lens plane to change where the plane of focus will be. When done horizontally, the angling is known as “swing”. Done vertically it is known as “tilt”.
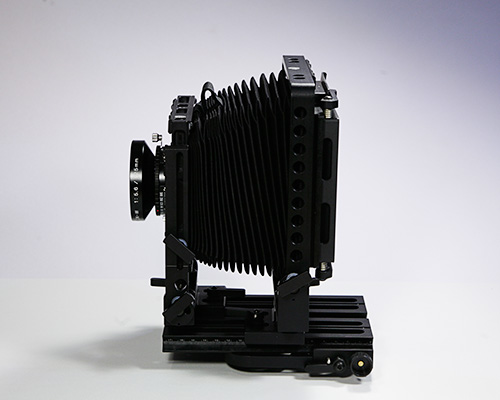
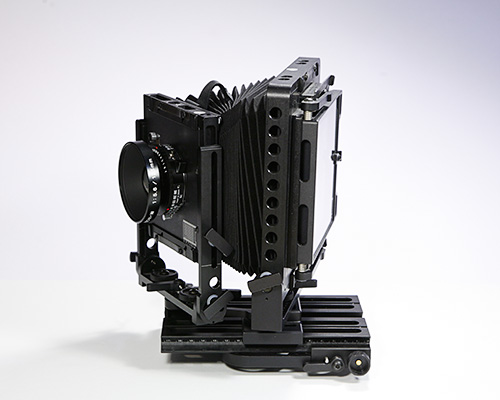
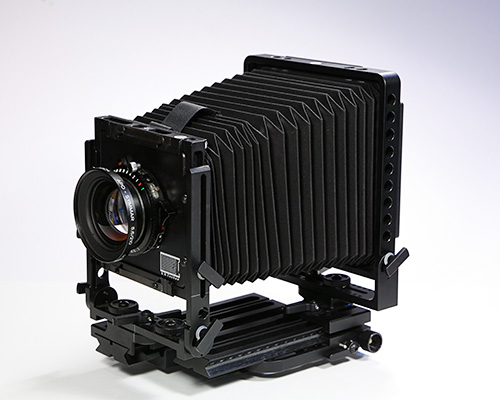
Below are two photos of the Canham. The first is with the lens plane parallel to the film plane (so similar to your standard camera in terms of the plane of focus), and the second shows the camera set for both front and rear swing. This is a more exaggerated swing than Bill used for the photo.
Lens plane parallel to the film plane
Lens plane at an angle to the film plane
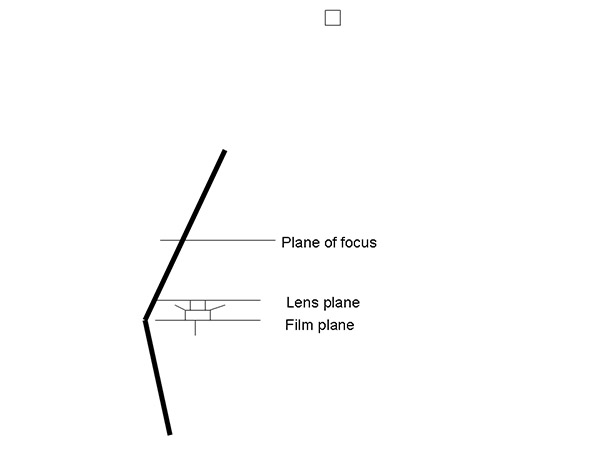
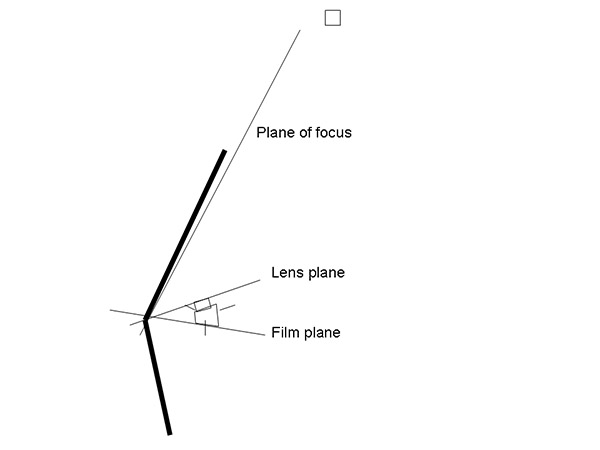
When the lens and film planes are no longer parallel, the plane of focus isn’t parallel either. This effect is known as the Scheimpflug principle (after Theodor Scheimpflug – an Austrian Army Captain). For his photograph of the Vietnam Wall, Bill applied primarily front and a little rear swing to change the plane of focus. As shown in figure 3, the entire wall and the Washington monument are in focus.
Figure 3
If you look at the original transparency for this photograph with a loupe, you can make out individual letters on the Wall on the first four panels. You can also read the letters on a very large print. If you stop by our booth at a show when we have the 22″X28″ framed version of The Wall at Dawn displayed, you’ll be able to read the names for yourself.
For many photographs, camera movements such as swing aren’t necessary. However, in certain circumstances, they are necessary to achieve your vision. Without the ability to swing the plane of focus, Bill’s The Wall at Dawn would be a nice photograph. With the swings – he was able to achieve your vision of a spectacular image with both the Wall and the Washington Monument in focus.
by hankinslawrenceimages | Feb 28, 2008 | Camera Collection
The other day, Bill started writing a blog post about how he uses a view camera to get some of the photos he has taken to match his vision. We both quickly realized that a) it was going to be way too long for one post, and b) it was incomprehensible to anyone who don’t use view cameras. So, we decided to start with a post on Bill’s large format camera, and then in future posts, explain how he uses it to get the photos he envisions.
(c) 2008 William Lawrence
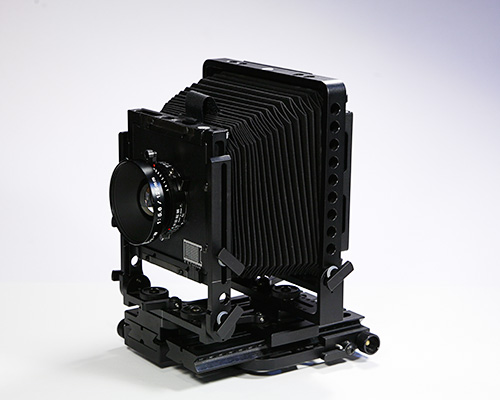
For his landscape photographs, when possible Bill likes to use a 4”x5” view camera. Currently he is using a K. B. Canham DLC45 aluminum field camera, shown above with a 210 mm lens on it. The camera is essentially a light-tight box, thanks to the bellows, that lets the lens focus light on the ground-glass back (to focus), and the film (when actually taking a photograph). For a 4×5 camera, the Canham is reasonably light, and folds up to allow storage in his back-pack.
The camera focuses by moving the front and rear standards closer or farther apart, with longer focal length lenses requiring more distance (and more bellows extension), and shorter focal length lenses requiring less. For example, the camera with his 125 mm lens (below), requires much less bellows extension, making it look more “compact” to focus at a given distance than the 210 mm lens.
(c) 2008 William Lawrence
Bill likes using a view camera for several reasons. First, instead of that little viewfinder you get on a 35mm or digital SLR, you are viewing the scene (although upside down and backward) on a 4”x5” piece of ground glass, and essentially seeing exactly what is going to be exposed to the film.
Second, the slow setup and focusing makes photo taking with a view camera a more thoughtful and deliberative process, which is helped by the large ground glass image. A standard view camera is not a good choice for fast-paced, rapid fire photography. In addition, the camera allows you to do movements that you can’t do on a 35mm or DSLR camera without special lenses.
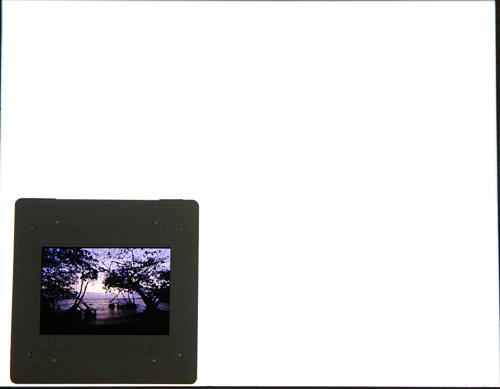
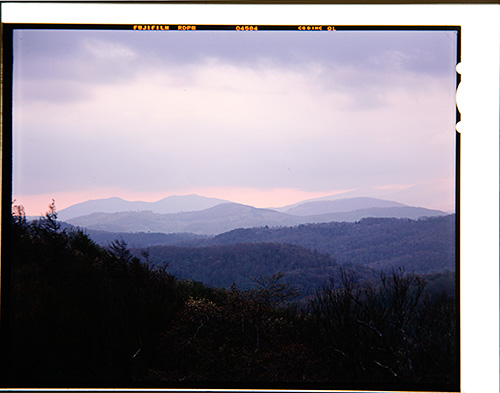
Finally, the image is recorded on a 4”x5” piece of film, large enough to produce large prints with excellent quality. To put this in perspective, the top image is a slide taken with 35mm transparency film, place on my light box so that you can see the image on the film. The image is about 1”x1.4” image. The transparency below is a 4×5 transparency on the same lightbox, to give you a sense of the relative sizes of the image. The 4×5 produces a huge image relative to 35mm and dslrs. When people ask how large can we print some of Bill’s photos taken on 4X5 film – we just look at them and ask what wall would you like to cover with it?
(c) 2008 William Lawrence
 (c) 2008 William Lawrence
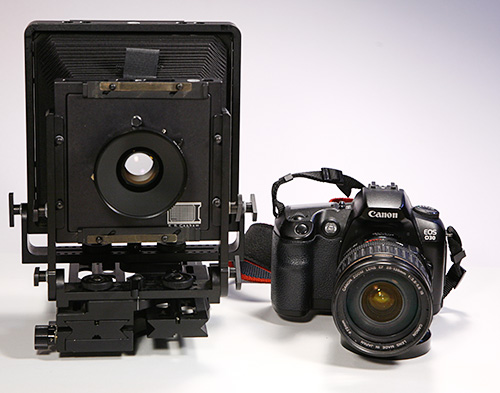
 The camera has a few downsides. It’s big – below is a comparison of the camera to one of our dslr cameras, and it requires a tripod to use. It is also expensive to use. One shot costs about $5 for film and processing. For this particular camera, you also have to call it a “K. B. Canham” – if you just call it a “Canham”, everyone thinks you are saying “Canon” (which makes lovely cameras, but no view cameras).
(c) 2008 William Lawrence
But despite those limitations, it is a fun camera to use. And, most importantly, Bill ends up with photographs that he is happy with when he uses the camera – which really is the best measure of whether any camera is the right one to be using. In the coming weeks, we’ll have more posts talking about Bill uses the large format cameras to get the photos that he wants.